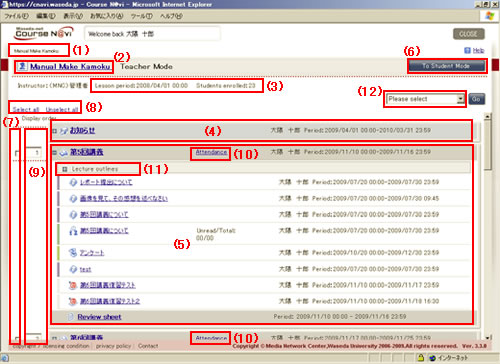
On the top of the Lectures window, the "お知らせ (information)" folder is displayed, and the created lecture folders are displayed under it.
(1) Course name
(2) Course name, current mode (teacher mode/student mode)
(3) Period of use, the number of the members
(4) Information folder
(5) Lecture folder: Clicking the or button in front of the lecture name displays or hides the contents of the folder.
(6) Switch between student mode and teacher mode: After you create content, you can switch to the student mode to see how it looks in student mode.
(7) Operation target checkbox: Select the target of copying or deletion.
(8) Select all or clear selections: Use either of these buttons when you want to select all items as the target of operation instead of selecting one by one, or to clear all the selections.
(9) Display order specification: Specify the order of displayed folders.
(10) Attendance: Clicking this item displays the Attendance Status window. This window allows you to check and update the attendance status of each class. In order to manage attendance, you need to check [Yes] for [Manage attendance?] when creating a lecture folder.
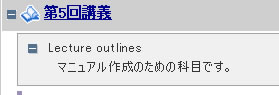
(11) Lecture outlines: Clicking the button in front of Lecture outlines displays the content of the lecture.
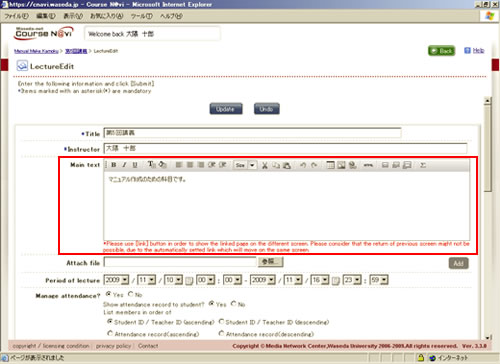
To display this, you need to enter an outline of the lecture in the LectureEdit window.
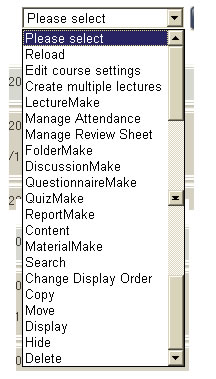
(12) Operation list box: Select the operation you want to perform, such as creating or copying content.
The operation list box allows you to do the following operations.
Reload
Updates the screen display.
Edit course settings
You can edit the course settings.
It is also possible to set the defaults to be used when creating content. While the values you specify here will be used as defaults, you can change the individual settings when creating (or editing) content.
To set default values, click the button in front of [Default Settings] in the LectureEdit window.
The following items can be set.
Subject:
– Limit number of member display on a screen (The number of users to list on one page when editing authorization settings, choosing notification recipients, or viewing reference history. If blank, all users are displayed on one page.)
– The order of row of member list display (Specify the display order of members in the reference history or class summary list.)
– Student process setting (Lecture charge, an educational coach, and the manager can share charge teacher’s study situation.)
– From E-mail address specified in (The appointment of the From e-mail address is possible by the individual email transmission of a message (quiz, report, class summary) news. This cannot be specified for private inbox messages.)
Announcements:
– Recipients (When specifying individual recipients, make sure to uncheck [All users].)
– Notice e-mail distribution
Lecture Settings:
– Start time
– End time
– Display in order of
– Number of lectures to display on one page (A page break is inserted each time the specified number of lectures are displayed in teacher mode or student mode.)
– Format (If you choose to hide the contents of the folder, you can open or close the folder on the screen by clicking the or button.)
– Features to enable
– Manage attendance? (In addition to selecting [Yes] or [No], you can set the [Show attendance record to student?] and [List members in order of] options.)
– Use Review Sheet? (In addition to selecting [Yes] or [No] , you can set the [Manage attendance], [To be completed within], [Full marks], [Show grade to student?], [Allow comments?], [Level of understanding], [List members in order of], [Check number of characters between], [Char Length Check], [List view], [Public Review Sheets], and [The name of the student to display] options.)
Discussion:
– Allow use of nickname?
– Display of photo?
– Select photo
– Allow new posts?
– Allow editing of posts?
– Allow deleting of posts?
– Grading method
– Show grade to student?
– Number of items to display on one page (A page break is inserted each time the specified number of items are displayed in the list in teacher mode or student mode. Only the number of new contributions is counted. The reply is not included in the number of cases.)
– Notify when replies are posted? (The system will send a poster a notice by e-mail when there is a reply to his or her article.)
– Notify of new posts?
– Check file extension? (If you select [Yes], specify the extension. In the case of a compressed file, the extension of the original file is not checked.)
Questionnaire:
– Allow anonymous responses?
– Allow users to temporarily save responses?
– Show results?
– List in order of
– Number of items to display on one page (A page break is inserted each time the specified number of items are displayed in teacher mode.)
– E-mail receipt (The system will send the responder a notice by e-mail when there is a reply to his or her response.)
– Post an announcement about the questionnaire?
Quiz:
– Allow comments?
– Allow students to temporarily save answers?
– Show grade to student? (to student only)
– Show results?
– List in order of
– Number of items to display on one page (A page break is inserted each time the specified number of items are displayed for the answer status in teacher mode.)
– Notify students when comments are made on their answers? (The system will send a student a notice by e-mail when there is a reply to his or her answer.)
– Post an announcement about the Quiz
Report:
– Allow Comments?
– Allow students to edit reports after submission?
– Allow students to temporarily save report?
– Make reports public?
– Show student name?
– Show grade to student? (to student only)
– List in order of
– Number of items to display on one page (A page break is inserted each time the specified number of items are displayed in teacher mode. In the case of a student, a page break is inserted into the disclosed report list each time the specified number of items are displayed.)
– Notify when comments are made on submitted items? (The system will send the reporter a notice by e-mail when there is a reply to his or her report.)
– Submission method
– Check file extension (If you select [Yes], specify the extension. In the case of a compressed file, the extension of the original file is not checked.)
– Main text (If you select [Display], the main text of the submitted report is displayed in the report list.)
– Allow students to resubmit reports?
– Allow students to submit after the deadline?
– Post an announcement about the Report?
– Check number of characters?
Materials:
– Display
Memo
If any of these settings differs from the corresponding personal setting, the personal setting takes precedence.
You can check and update the attendance status of students. In order to manage attendance, you need to check [Yes] for [Manage attendance?] when creating a lecture folder.
You can manage reviews given by students.
In order to create review sheets, you need to check [Yes] for [Use Review Sheet?] when creating a lecture folder.
You can display a folder or content that is hidden in the Lectures window.
How to do it: Check the [operation target checkbox] of the folder you want to display, select [Display], and click the button.
Hide
You can hide a folder displayed in the Lectures window from students.
How to do it: Check the [operation target checkbox] of the folder you want to hide, select [Hide], and click the button.